Hi everybody,
For me, the Blocking phase is the crucial part of the development of a shot.
In that stage, you will have to mark all the necessary information of timing and posing so your director will perfectly understand the acting decisions you are going to take.
The beginner's big doubt is to know when does this phase ends and what can he do to improve his blocking.
That's why I am sharing here with you my workflow step by step…
OBJECTIVE
As I wrote on above, the purpose of this phase will be to define the acting through the extrems and changes of direction. That's why, We need to find:
• CLARITY in NARRATIVE
• APPEAL in POSES
• ENTERTAINMENT in TIMING
• ORGINALITY in GESTURES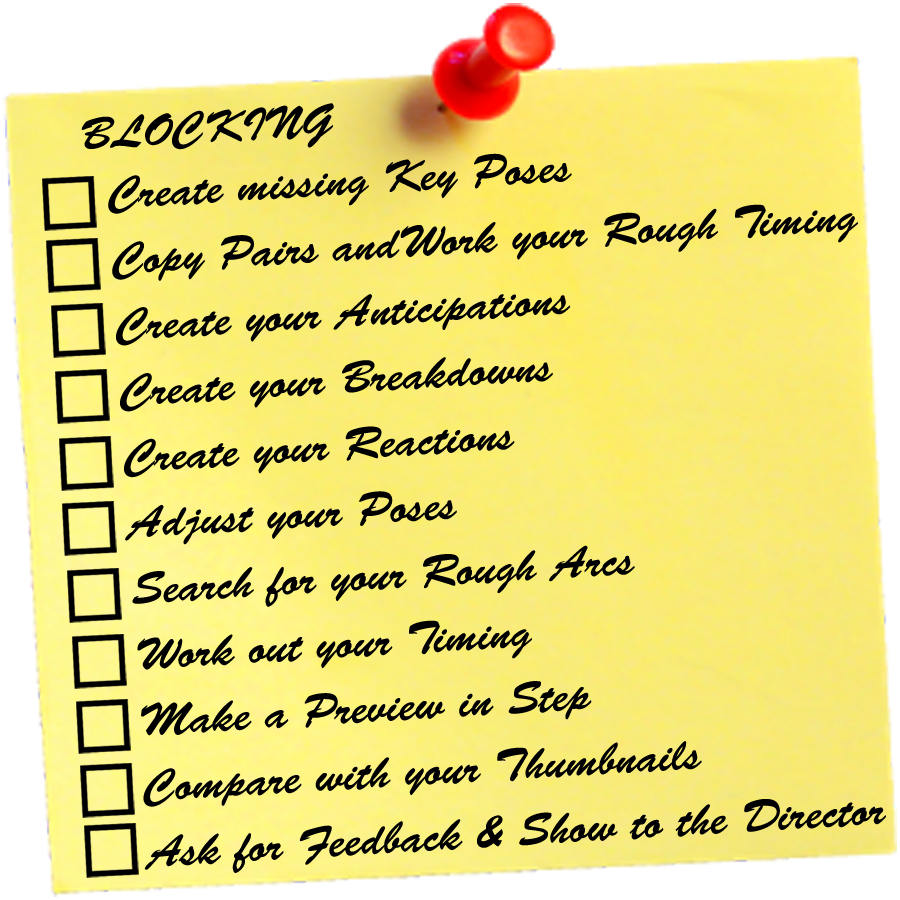
METHODOLOGY
Those are my steps :
1. Create the missing Key Poses : Basing on the accents and pauses of the audio, mark the main key poses, looking for contrast between them.( I recommend to start with the first and the last pose to know where the character begins and ends and avoid having problems of staging and hook up)
2. Do the Copy Pairs : That means duplicate those key poses to work out the Rough Timing.
3. Work the Rough Timing : Work a first version of the timing to define how long those keys poses are going to maintain and define the duration of the transitions between them.
4. Create the anticipations : Now that you know the speed of your actions, you can define the anticipations you are going to need for those movements.
5. Create the Breakdowns : On the basis of the marked anticipations, elegid cuales son las partes que queréis «Favorecer» en el movimiento. That means, whose parts are going to overlap during movement. Pay attention to the rough arcs, the overlaps and the spacing.(I recommend to use the tweenmachine)
6. Create the Reactions : According to the breakdowns previously marked and forces used, you can now mark the reactions of your character.
7. Adjust your Poses : Once you have all the poses required to define the actions (The combo Key pose – Anticipation – Breakdown – Reaction – Key Pose), try to check the relationship between them.
8. Search for your Rough Arcs : In the transitions, look for the arcs throught which are going to pass the different parts of the body and emphasize them.
9. Work out your Timing : At last, play with the position of your poses on the timeline to exaggerate the timing and find out an interesting rhythm. (I recommend to work that part on spline mode to better see the timing)
10. Activate the visibility of the stage and props and do a preview in Step mode.
11. Compare with your thumbnails.
12. Ask your mates for feedback.
13. Show to the Director : Make sure that you have marked all the information necessary to transmit the message of the shot and that you have communicated your ideas clearly so the director can understand your intentions.
CONCEPTS
Once finished, you have to ask yourself if your concepts are working :
• Intention and message : Do your Blocking summarizes clearly the intention of the director and the message and purpose of the shot? Does your shot work within the sequence?
• Character : Do the pose corresponds to the personality of the character? his anatomy, his limitations?
• Action : Do we understand perfectly what the character is doing and transmitting at this moment?
• Mood : Do we understand how the character feels and what is he thinking? Are you transmitting the poses you've planned?
• Monologue : ¿Habéis compuesto vuestro plano para que se entienda el «Thought Process» del personaje? What is going through his mind, what does he think?
• Style : Do the poses corespond to the style of animation?
• Progression : Do you like what you have done?¿Os habéis asegurado que lo que habéis hecho no sea demasiado «cliché»? How another animator should have done it?
TOOLS
If you didn't get to thoses previous concepts, here you have a toolkit to fix it :
POSES (See POSES)
• Movement : Have you created all the poses necessary to understand the action (Key pose, Anticipation, Reaction)? Does each pose works with the previous and the following one? Have you defined the arcs through which will pass the different parts of the body and how they are going to offset??
• Layout : Have you used the staging and the objects to clarify your acting?
• Forces : Have you found the power centers and the external forces and transmited through the line of action the intention of the character? Did you understand how things move before moving them?
• Physicality : You have checked the solidity of the body dynamics and marked the angles of the torso and shoulders depending on the weight, balance and fulcrums?
• Composition : Have directed the viewer's attention thanks to the composition and the lines of force??
• Design : Have you maintained a harmony in the poses, avoiding twinning, tangents?, in other words : Does your poses have appeal?
• Contrast : Have you worked on the silhouettes and negative spaces in order to have clear and simple poses?
• Exaggerate : Have you exaggerated enough your poses, tweaking them if necessary and using the squash & stretch?
• Entertainment : Did you use all the parts of the character to transmit your intention?
TIMING (See TIMING)
• Narrative Timing : Did you use the timing to direct the viewer towards the center of attention and try not to confuse him?Have you ensured that the viewer can clearly track the movement?
• Mechanic Timing : Have you checked that the character is moving logically in its environment and facing correctly the forces he is surrounded??Have you checked that the character has weight?
• Rhythmic Timing : Have you avoided having a too repetitive and boring rhythm? Did you played enough with texture to create a credible and interesting shot? Do the rhythm that you have chosen supports the emotion and the message of your shot? Have you exaggerated enough your timing?
TIPS & TRICKS
• Try to work in Full Key (Key in all the controllers) and as far as you can in FK to maintain a relationship between elements.
• To check if you have done all the poses necessary, go to spline mode and check if you are missing a beat or a gesture necessary to the understanding of your shot.
• Atention: Don't put the excentrics actions yet (Shakes, small isolated gestures, overlaps…) to be able to work your spacing in the next phase without having too many poses.
• To find out if you have marked too many poses, It is just simple as going on spline mode and delete the pose in which you have doubts and check if it changes your animation drastically. If this is the case it means that you have marked an ease, an excentric action or irrelevant information that will bother your spacing work.
• When I don't have to follow an audio, I am use to tight a maximum the timing to be more entertaining.
• I usually work the blocking in spline mode but I'm alternating visibility on stepped to see which are the missing poses.
• Use the inner monologue as a timing tool. If you have problems to work on your timing on this stage, record a inner monologue and use it as an audio reference in your 3D software.
Characters courtesy of boutique23.com
I hope that was usefull…
Keep animating!!!
12 comments “BLOCKING or How to create a good blocking step by step?”
excellent explanation. Very necessary for those who are dedicated to animation since there are many different criteria when organizing the development of a flat animated. Thanks for sharing.
thanks, it was very helpful
Thank you!! Always good to have in words that we sometimes have only roughly unconcious on our minds and end up missing specially when we need it the most (times when we’re lacking productivity specially!). A superb and clarifying explanation, and a lot of special tricks I’ll use certainly!
You are welcome Jorge. Hope next articles are going to help you too 😉
Thank you for the advices, it’s clear and efficient! Perfect Checklist for beginners and expert 😉
Thanks Jeremy! Glad you like it 😉